
Shanghai chengsi intelligent technology co., LTD
Contact: Mr. Gao
Phone: 17701637746
Phone: 19821311892
Address: no. 265, east street, zhuangxing town, fengxian district, Shanghai
The tested fabric is installed in the sample fixture above and rubbed against the abrasive material installed on the grinding table. The friction track is the figure of li sharu. After the friction times are set, the pilling and pilling are evaluated or the wear times of the sample are recorded.
The instrument features
The unique design allows for experimental setup and inspection without lifting the top guide plate.
This instrument can count the friction times of each sample and the preset total experimental friction times.
This instrument has a connection function, allowing users to do different experiments at the same time.
This instrument is equipped with a full set of sample clamps, which can be used to ensure the correct pressure is applied to the test fabric.
Test standard
Martindale meets the following criteria:
ASTM D 4966(abrasion resistance)
ASTM D 4970(pilling)
BS 5690:1991(replaced by BS EN iso12947-1)
BS 3424: Part 24 (Method a) 27
BS EN ISO 12947-1
BS EN ISO12945-2
SFS 4328(Finnish standard)
IS 12673(Indian standard)
IWS/Wool Bureau TM 112(wear resistant)
IWS/Wool Bureau TM 196(pilling)
The IWTO - 40-88 (E)
JIS L1096
M&S P17 & P19
SATRA PM31(including wet state testing)
SN 198525 & SN 198529(Swiss standard)
Combine standards with user requirements.
The attachment list
When you open the package, please check the following materials:
Host 1
9 pilling test accessories
9 sample racks
9 kpa weights 9
12KPA weights 9
There are 9 sample positioning rings
Standard abrasive cloth (1m*1.5m)
Standard foam (1.5m*0.5m)
1 special sample loader
1 volume of instruction
1 power cord
Test parameters
According to relevant standards, in the test of abrasion resistance, the motion trajectory of the sample is different from that of the pilling test. This instrument can change its trajectory according to the test method and customer requirements, and the corresponding test parameters are shown in the following table:
Table 1: da li sha ru curve (abrasion resistance test)
The speed of the transmission shaft (see note 1) is 47.5±2.5r/min
External transmission speed: internal transmission speed 16:15
Travel of external drive shaft is 60.5±0.5mm
Internal drive shaft stroke is 60.5±0.5mm
Fixture block diameter is 28.65±0.05mm
Parallelism between guide plate and grinding platform (see note 2)<0.05mm
The clearance between sample fixture and grinding table is <0.05mm
Sample fixture assembly (fixture, pin shaft and loading block) mass 595±7g
795 + 7 g
Table 2: xiaoli sharu curve (pilling test)
Travel of external drive shaft is 24.0±0.5mm
Internal drive shaft stroke 24.0±0.5mm
The friction area of the sample holder is 64cm2
Fixture assembly quality (fixture, rubber ring and pin shaft), 155±1g for knitted fabrics
Fixture assembly quality (fixture, pin shaft and loading block), 415±2g for woven fabrics
Table 3: linear motion
External shaft velocity (see note 1)47.5±2.5r/min
Size: 60.5±0.5mm
Fixture block size: 28.65±0.05mm
Parallelism between guide plate and grinding platform (see note 2)<0.05mm
The clearance between sample fixture and grinding table is <0.05mm
Sample fixture assembly (fixture, pin shaft and loading block) mass 595±7g
795 + 7 g
Note 1: check the rotation speed of the instrument with a stopwatch and record the number of friction within 5min. Counters should also be checked to make sure they work properly.
Note 2: use a dial gauge to check parallelism.
Note 3: check the clearance between sample fixture and grinding bench with a feeler.
calibration
After use for a period of time, check the instrument with pure black printed fabric to confirm whether it is set correctly.
7, normal operation 7000 times, check the sample color change. If it is not uniform, the instrument is not set correctly. The Settings listed above should be checked. It is recommended to check regularly according to the usage.
If the laboratory does wear and mass wear experiments, use two reference cloth intervals to do the experiment until the end of the experiment.
If the wear is not uniform, it is recommended to check the parallelism of the grinding table.
Instrument installation
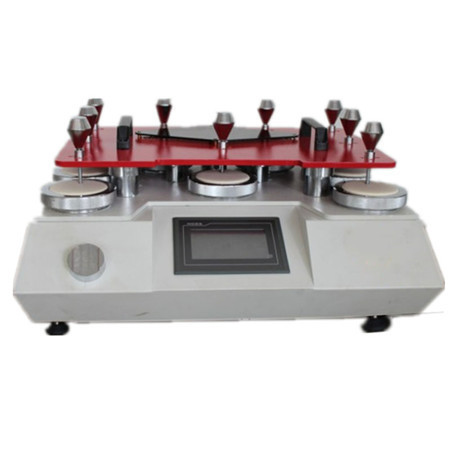
It can be known from 3.4 that the installation of the instrument is also different according to different motion trajectories (large, small lisharu figure or linear motion) and test purposes. The diagram shows the overall structure diagram of the instrument:

The top part is the guide plate, and the friction head is fixed on the guide plate through the pin shaft. The movement of the guide plate drives the movement of the friction head. There are three moving tracks on the guide plate, which are connected with the drive shaft during the test.
Below the guide plate are the drive crank and drive shaft. Drive the crank to make circular motion, drive the drive shaft movement and drive the guide plate movement. The different positions of the shaft will affect the trajectory of the motion.
There are 9 friction tables on the test bench, which can meet the requirements of simultaneous testing of nine samples
The control base contains a control panel (the instrument is operated by touch screen, without keys) and a clamping ring. The clamping ring ACTS as an assistant to clamp the sample.
Shaft position
Changing the movement type involves changing the position of one or more drive shaft blocks on the drive crank.
First make sure the instrument is stationary.
Remove the sample holder (if mounted) and guide plate.
Move the shaft block to a new and suitable position.

For wear test: three drive shaft blocks must be at position A.
For pilling test: three drive shaft blocks must be at position B.
For the straight test: the middle drive shaft block is in position B, and the edge two drive shaft blocks are in position A.
Carefully place the guide plate on the instrument in the correct position.
Clamping of samples and related test accessories
In the test of wear resistance, the standard felt is put on the grinding table first, then the standard friction fabric is put on, and finally it is clamped by the clamping ring.

For the start ball test, the first layer of the grinding table is covered with standard felt, and the second layer is covered with samples.

A standard piece of foam is placed in the fixture used for the wear test, and the sample is placed at the bottom for wear test.

Note: felt can be used 100,000 times or until hardened.
Standard abrasive cloth should be replaced at each test.
Polyurethane foam liners should be replaced during each test.
When all the grinding bench and sample fixture are installed, place the sample fixture on the grinding bench.
Place the pin shaft on the sample holder through the bearing.
According to the running times set in part 4, power on to start the experiment.
Sample preparation - pilling
(note: adjust instrument Settings if this operation has not been done before)
After marking abrasive and sample moistening, cut the required number of samples with a diameter of 140mm. There are two sets of samplers, one for ball table and the other for sample holder.
Place the pilling auxiliary sample assembly on the work table with the small size below.
The wear-resisting sample clamping ring is set outside the auxiliary sample loading device.
Place the 140mml diameter aluminum alloy fixture on top of the auxiliary sample assembly. It's the extra edge hanging out.
Place the loading block with a diameter of 90mm on the top of the auxiliary sample loading device.
The sample holder is placed on the felt.
Carefully roll the rubber ring onto the socket of the aluminum fixture plate.
Remove sample holder.
The pin shaft is the same as the worn pin shaft.
Put the loaded samples on the grinding table, see table 1, and conduct the experiment with reference to the standards.
See 5.1 for details of the experiment
Repeat the above steps to sample each mill and fixture.
Make sure the readings are zero at all stations, and start the experiment on a preset number of times.
The end point of the experiment varies according to the label.
Experiment procedure - wear out
Test sample worn out
1. Four test samples are usually tested, and one is placed on a grinding table.
2. Check the wear condition of the sample at specified intervals, without removing the sample from the fixture.
3. If necessary, use a magnifying glass or microscope for inspection.
4. The end point of the experiment can be judged when two yarns of the sample break.
5. The experiment was carried out until all samples reached the end point.
6. Records are the results and averages of each sample.
7. Attach worn out samples to the report form.
8. Note that once the sample is damaged, it is not necessary to replace the fixture to continue the test.
Determination of mass loss
See table 4 for sample quality loss.
The sample is weighed before and after each preset interval.
Sketch the quality loss.
(see ISO 12947-3 for more details)
Table 4
Test group number of sample wear test interval sample quality loss test interval
A≤ 1000100,250,500,750,1000, (1250)
B1000-5000500750100, 0250, 0500, (7500).
C5000 00-100001000250, 0500, 0750, 0100, (15000).
D10000 00-250005000750, 0100, 00150, 00250, (40000).
E25000-500001000015000250004000050000 (75,000)
F50000- 10000010000000, 25000000, 50000000, 75000000,100000, (125000)
G > 10000025000500, 00750, 00100, 000, (125000).
The above number should be agreed by the parties concerned
Experiment procedure - pilling
Pilling test
Table 5 shows the attachments for pilling testing.
The result of the sample rubbing for a period of time. (see BS EN ISO 12945 for more details)
Table 5
0.65kpa for woven fabrics, all upholstery (including knitted fabrics) Swiss pilling assemblies and pilling loading blocks
0.25kPa for knitted fabrics (excluding interior) Swiss pilling assemblies and pilling loading blocks
Table 6
The first group of 125 laps
The second set of 500 laps
The third set of 2,000 laps
Three sets of samples are used to provide examples of zero, mild and moderate pilling described below during the evaluation process.
When testing in the third group, after every 500 cycles, it is important to stop the machine and gently brush away any loose fibers that may have gathered on the test surface.
Table 7
Different fabric types wear out loading block evaluation grade wear out times
Inner trim wool standard ground cloth 415±2g1500
21000
32000
45000
2 woven fabrics (excluding interior trim) woven fabrics (face to face or wool)415±2g1125
2500
31000
42000
55000
67000
Knitted fabrics (excluding interior decoration) 155±1g1125
2500
31000
42000
55000
For species 2 and 3, the minimum number of friction is 2000, and a pilling level of 4-5 is acceptable if friction is 7000.
evaluation
The sample is observed in a light box. Light boxes should be placed in dark rooms.
Place the sample vertically on the light box with the original sample, keeping the long side in the vertical direction, paste it with tape if necessary, place the sample to be rated on the left and the original sample on the right.
The line of sight is perpendicular to each specimen.
There are five ratings for pilling
5 no pilling or very slight pilling
4 slight pilling
3 medium pilling
2 severe pilling
1 very severe pilling
Evaluate each sample according to the above criteria, allowing evaluation results between two grades, such as: 3-4
The results of
Record the rating results of each sample and calculate the average value. If the average value is not an integer, record the nearest half grade. The experimental error should not be greater than half grade.
Lab report
The lab report should contain the following information:
Sample description;
Any pre-processing details;
Number of samples and observers;
Use abrasive;
Loading block quality;
Friction times and pilling grades;
Test date;
Final rating results;
Any deviation from the standard.
Calibration and maintenance
The calibration
Get the lisharu map
Use the following method to get the lisharu diagram from each station.
Remove the material from the mill. Put a piece of flat white paper on each grinding table, with a diameter of (100±5)mm and a mass of 100g. M2, to ensure that the surface of the paper is smooth enough.
Insert the bearing sleeve with a custom ball point pen of the same diameter as the bearing sleeve, perpendicular to the paper surface, with the tip just touching the paper surface.
4. Press the start button, the guide plate drives the ball pen movement to draw a map of li sharu on paper.
Draw on a piece of paper the lissaru pattern just touching the outermost curve. The two opposite sides are two parallel lines.
The two lines drawn are at right angles to the other two.
The measurement error is ±0.2mm when the lisharu diagram is checked. If the lisharu diagram is not uniform, there may be the following reasons:
1. Guide plate and grinding table should be parallel. Measuring with micrometer, permissible error ±0.05mm.
2. The surface of the sample fixture and the grinding table are without gap. Check with the feeler.
3. Adjust the bottom plate of the grinding table to level.
4. Adjust the drive crank to the appropriate position.
maintenance
1. The sports guide plate should be lubricated with a small amount of grease.
2. The ball should be coated with a small amount of grease.
Please contact qianshi technical department for further calibration and maintenance.
Accessories and consumables
38 mm sample cutter
140 standard abrasive and felt sampler
Standard abrasive SM25
Standard abrasive (M&S P19B)
Standard foam liner
Diameter of standard felt 140mm(woven)
Felt (woven)
Standard felt diameter 140(non-woven fabric for M&S)
Felt (non-woven fabric for M&S)
Felt pad for pilling (90mm)
Fixed sample rubber ring (for pilling)
EMPA pilling standard (knit)
EMPA pilling standard (knitted and woven)
SM50"
Silicon carbide piece
Shanghai chengsi intelligent technology co., LTD
Contact: Mr. Gao
Phone: 17701637746
Phone: 19821311892
Address: no. 265, east street, zhuangxing town, fengxian district, Shanghai