
Shanghai chengsi intelligent technology co., LTD
Contact: Mr. Gao
Phone: 17701637746
Phone: 19821311892
Address: no. 265, east street, zhuangxing town, fengxian district, Shanghai
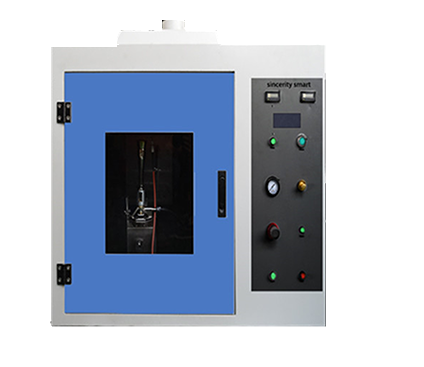
Curtain combustion tester
Instrument is introduced
The test principle of
The fabric film flame propagation tester (drape-burning tester) is developed in accordance with NFPA 701-1 and is suitable for testing flame spread by burning flame from sample surface or bottom edge without external radiation.
A dowel is used to hold the moistened sample vertically in the sample combustion chamber and a standard combustion lamp is used to light 45s. Observe the imagination of measuring combustion, measuring the time of combustion and weight changes before and after combustion.
Test standard
This fabric film flame propagation tester meets but is not limited to the following standards:
NFPA 701-1
Technical specifications

Instrument size: 800 × 750 × 630 mm;

Cavity size: 700 mm 750 mm 460 mm;

Air inlet: 7.0mm;
Inlet pressure: ≤1 MPa
Burner: meckel (fischer) blowtorch
Igniter: electric arc
Weight: 40 kg;
Power supply: 220 V
The test object
This instrument is developed for NFPA701 method 1, and the test objects include curtain, stage curtain, curtain, textile screen, tablecloth, etc. Thicker or coated materials are not suitable for this method.
Composition and use of instrument
listing
This instrument should be carefully unpacked and inspected. For any damage or loss of the instrument, please contact the customer service department of xi company.
When you open the package, please check the following materials (subject to the actual contract) :
1 main engine;
One shaft pin (including nails) for fixing the sample;
Shaft pin fasteners for fixing samples;
100mm(90mm~110mm) flame ruler
Observation window (combustion chamber) : open the front door of the instrument during test, and close the front door when not in use to keep the instrument clean.
Air vent: air guide fan is set;
Timer 1, timing button 1: precision 0.1s, press the timing button 1, start the timer 1, press the timing stop again, press the yellow button on the timer to clear the timer;
Timer 2, timing button 2: : precision 0.1s, press the timing button 1, start the timer 1, again press the timing stop, press the yellow button on the timer to clear the timer;
Power switch: main power switch, indicator light means power on;
Intake pressure gauge: shows the gas pressure entering the instrument;
Pressure adjustment knob: the external gas will be reduced to the instrument can be used gas;
Flow regulation: regulates the flow of gas into the burner.

Lamps and lanterns to adjust
This instrument USES imported merkel (fischer) blowtorch, suitable for all types of gas, equipped with damper and flame adjusting knob.
The tip of the ignition needle shall be installed on the surface of the blowtorch, about 5mm from the edge and above the vertical distance of about 5mm.
After the flame is lit, adjust the flow rate on the adjustment panel to make the flame size moderate, and adjust the damper and the flame fine tuning knob to adjust the color of the flame. When methane or other gases are used as gas, this test requires a flame height of 100mm and a blue flame.
Sampling and preparation
Sampling shall be performed in accordance with method 1 in standard NFPA 701, with appropriate fine-tuning if non-standard tests are required.
The sample size is 150mm×400mm, and the sample is cut along the longitude and latitude direction. The length direction is the vertical direction, and the vertical direction of the actual use position of the material is the length direction. For multilayer sample measurements, please refer to NFPA 701 for suture treatment.
The sample should be dried at 105℃ for at least 30min. If the sample will undergo deformation or other reactions at 105℃, the sample should be dried at 20℃ for at least 24h.
A minimum of 10 samples are prepared from the standard test, each of which is numbered and weighed before combustion to 0.001g(or as otherwise required).
The sample is then placed on the internal sample rack of the instrument. The sample bracket can be adjusted by means of screws on both sides to make the lower end of the sample flush with the flat burner center. The position of the sample rack is shown in the figure. The height and height screws are adjusted according to the figure:
Flame adjustment
Confirm that after the blowtorch is laid flat, the center of the blowtorch head is 25mm away from the sample (the instrument has been adjusted when leaving the factory).
Keep gas lamp upright and connect gas. Make sure that the air pressure adjusting knob, flow adjusting knob and blowtorch adjusting knob are properly opened. Press start button to ignite the blowtorch. If not, please check whether the air path is smooth. Adjust the flame until the yellow flame disappears, showing orange or blue flame, and ensure the flame height is 100mm.
Keep the flame steady for at least 5 minutes. A flame suitable for testing is shown below:

Fire test
Place the burner upside down and push the burner into the sample position. The flame starts to ignite the sample. After 45s, the system cuts off the gas and the torch stops burning automatically.
Observe whether the sample starts to burn. If the sample burns, press timer 1 to start the timer, and stop the timing after the sample burns.
At the same time, observe whether there is any droplet. If there is any droplet combustion, press timer 1 for timing, and stop timing after the sample combustion. Afterburning time was revised to the maximum duration of sample and low content combustion.
Shanghai chengsi intelligent technology co., LTD
Contact: Mr. Gao
Phone: 17701637746
Phone: 19821311892
Address: no. 265, east street, zhuangxing town, fengxian district, Shanghai